Extend an Oracle ADF Faces dashboard application to support persistent user personalization.
Many enterprise applications being built today require flexible, dashboard-style presentation of visual data—bar charts, graphs, and the like—showing various levels of information at a glance. Flexibility these days also assumes a certain amount of personalization. Users want to be able to rearrange how the information appears in any dashboard to best suit their needs.
The panelDashboard component of the Oracle Application Development Framework (Oracle ADF) Faces feature is a JavaServer Faces (JSF) layout container that Oracle ADF developers can use to implement such information dashboards. The panelDashboard component supports various types of child components that can be arranged into columns and rows of equal sizes.
This column will teach you how to change the Oracle ADF Faces panelDashboard component default layout behavior so that users can reorganize information areas according to their needs. You’ll also learn how to persist the user’s changes to the UI beyond the current session by configuring Oracle Fusion Middleware’s Oracle Metadata Services (MDS) feature in conjunction with the Oracle ADF Security feature so that the user’s personalized UI is displayed whenever that person logs in. This column steps you through the process of making the necessary changes to a baseline application that ultimately supports personalization across application restarts.
The JSPX language was used for building the sample application’s page definitions, but the techniques detailed in this column will also work for projects that use Facelets as the view declaration language rather than JSPX. Facelets, a feature of JSF 2.0, are fully supported in Oracle JDeveloper 11g Release 2. To learn more about Facelets, see bit.ly/A0RpBT.
Sample Application Overview
The sample application workspace contains a panel dashboard page that uses graphs and gauges in the Oracle ADF Faces Data Visualization Tools feature to display salary information in a static grid.
Instances of the Oracle ADF Faces af:panelBox component are used as immediate child components of the af:panelDashboard to form a two-row, two-column grid.
To follow the instructions provided in this column, download the o32adf-1549375.zip sample zip file.
The zip file contains two folders:
- AdfDashboardCompleted contains the Oracle JDeveloper 11g Release 2 (11.1.2.2) workspace for the completed application.
- AdfDashboardHandsOn contains the starter workspace.
Getting Started
To step through the example, you need the studio edition of Oracle JDeveloper 11g Release 2 (11.1.2.2) or a later release, available as a free download from Oracle Technology Network. You also need an Oracle Database instance with the unlocked HR schema.
To set up and run the example application
- Unzip the o32adf-1549375.zip file into a directory on your local machine.
- Launch Oracle JDeveloper 11g Release 2. From the Oracle JDeveloper menu, select File ->Open and navigate to the directory containing the unpacked sample application.
- Open the AdfDashboardHandsOn folder and then the PanelDashboard folder, and select thePanelDashboard.jws file.
- Click Open. The workspace opens in Oracle Jdeveloper.Before attempting to run the application, you must change the database connection information to point to your HR database schema.
- From the Oracle JDeveloper menu, select View -> Database -> Database Navigator.
- Expand the PanelDashboard node.
- Right-click the hrconn node and select Properties from the context menu. Edit the database connection information to work with your setup. Apply changes, and click OK to close the connection properties.With a working connection to your database, you can now run the sample application.
- In the Application Navigator, expand the ViewController project node to display the Application Sources and Web Content folders.
- Expand the Web Content folder, click the DashBoardPage.jspx file within it to select it, right-click it, and select Run from the context menu.
If this is the first time you’re running an application in Oracle JDeveloper, the Create Default Domain dialog box will appear, prompting you to create a password for the default Oracle WebLogic Server domain (“weblogic”) associated with Oracle JDeveloper. Choose a password, enter it in the dialog box in the appropriate fields, and click OK. The application opens in the browser, as shown in Figure 1.
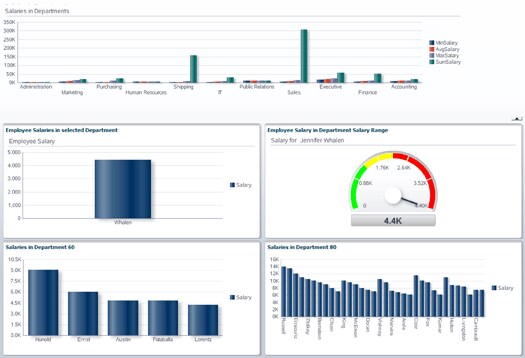
Figure 1: Dashboard starter application
The dashboard application consists of the base panelDashboard component with four panelBox components. The topmost component (the “Salaries in Departments” graph) is not contained within the panelDashboard component and thus remains fixed at the top of the UI.
Explore the sample application by clicking any bars in the “Salaries in Departments” graph, and you’ll see that the two panel boxes in the middle of the page are updated to reflect the data change. Click a bar in the “Employee Salaries in selected Department” panel box to change the gauge graph data displayed in the “Employee Salary in Department Salary Range” panel box. This shows the selected employee salary in relation to the low-, medium-, and high-salary range for the selected department.
The two panel boxes at the bottom of the page both contain bar graphs that are not dynamically updated.
Select one of the four panel boxes and try to move it to another location in the dashboard, and you’ll see that it cannot be moved. However, that’s one of the first things you will enable as you step through this column.
Extending the Sample Application to Support Persistent Personalizations
The starter application is a one-size-fits-all dashboard UI. You’ll extend the base functionality to enable users to drag and drop the charts and graphs. You’ll also modify the application so that user changes are persisted, resulting in a personalized UI presented each time the application is launched. To implement drag-and-drop for the panelDashboard child components and to persist user-applied changes, application developers must make changes to the base application in several different layers, as follows:
- Enable drag-and-drop on the Oracle ADF Faces panelBox child components in the panelDashboard.
- Enable personalization by configuring MDS for the ViewController project and the panelDashboard component.
- Enable detection of panelBox component reordering and notification when such changes occur.
- Configure Security for user authentication so that any changes made to the UI are associated with the user who made them and will be presented to that user even after application restart.
Most of these tasks are accomplished with Oracle JDeveloper’s declarative and visual tools or with a few changes to configuration files, as detailed in the remainder of this column.
Enabling Basic Drag-and-Drop Functionality
To enable panelBox components to be moved within the panelDashboard component, the panelBox must be marked as a drag source. You can do this declaratively in Oracle JDeveloper by simply adding to each panelBox the necessary tag—an af:componentDragSource tag in this case. The af:componentDragSource tag is an Oracle ADF Faces behavior tag that encapsulates the JavaScript code (which you would otherwise have to write) for implementing drag-and-drop in HTML pages. Behavior tags are just one example of how Oracle ADF Faces improves developer productivity by providing functionality that typically would require custom code.
To mark the panel boxes as drag sources, you drag the componentDragSource tag from the Component Palette and drop it onto each of the panelBox objects of the application. This gesture (dragging items from the Component Palette onto a page) is easy to do in the Structure window:
- From the Oracle JDeveloper menu, select View -> Structure to open the Structure window, and select View -> Component Palette to open the Component Palette.
- In the Application Navigator, double-click the DashBoardPage.jspx file to launch the Oracle JDeveloper visual editor.
- In the opened editor, click in one of the panel boxes, such as the “Employee Salaries in selected Department” box.
In the Structure window, you should see the af:panelDashboard component and its contained af:panelBox children. Now move to the Component Palette:
- Select ADF Faces from the menu.
- In the search field above the menu, type component drag source and press Enter (or click the right-arrow search button). The search results return the Component Drag Source (ADF Faces .Operations) tag.
- Drag the Component Drag Source tag from the Component Palette to the af:panelDashboard, and drop it onto the first af:panelBox child component in the af:panelDashboard.
Repeat this process for the other three panel boxes in the dashboard. When you finish, every panel box will have an af:componentDragSource as a child component (see Figure 2).
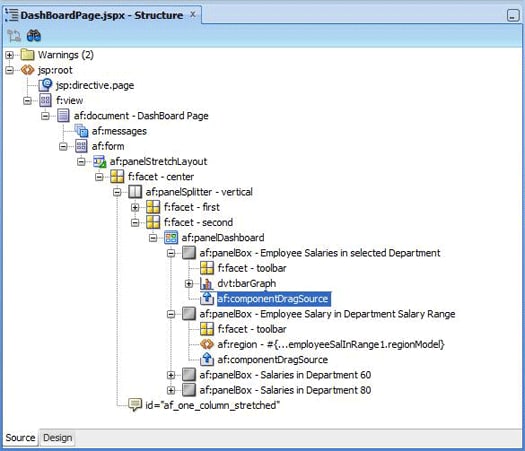
Figure 2: Oracle JDeveloper Structure window, showing component tree
Right-click DashBoardPage.jspx, and select Run from the context menu to run the sample application again. When the application appears in the browser, select a panel box and move it within the dashboard, as shown in Figure 3. When you release the mouse button, Oracle ADF Faces will drop the panel box into position.

Figure 3: Dragging a panel box at runtime
Nice! But we’re not done yet. If the user quits the application at this point, the changes to the UI won’t be retained. To persist changes made by any user, we must configure personalization with MDS for this ViewController project.
Enabling and Configuring Personalization
MDS, the personalization and customization engine at the heart of the sample dashboard application, is a repository-based customization framework that is tightly integrated with the Oracle ADF request lifecycle. Two levels of personalization are available:
- “Seeded” personalization, in which different UI components and data are presented to different users, according to group membership, role, location, or other information
- Per-user personalization
For this sample application, we’ll set up MDS for per-user personalization. Incorporating MDS functionality into an Oracle ADF Faces application starts by enabling the functionality in the ViewController project layer. Follow these steps:
- Click the ViewController project node in the Application Navigator,
- Right-click ViewController and select Project Properties from the context menu,
- In the Project Properties dialog box click the ADF View menu item. The ADF View panel appears,
- Click the Enable User Customizations checkbox,
- Click Across Sessions using MDS,
- Click OK to save the settings and close the Project Properties page,
When you save these settings, the dashboard application’s web.xml deployment descriptor is (transparently) updated with the necessary context parameters for MDS. The application’s adf-config.xml is also updated with the change manager configuration.
However, the adf-config.xml file still requires a few other changes to support the personalization mechanism on a per-user basis.
In MDS, information is saved in layers identified by a Java object, the customization class. The user layer is defined by an existing Java object, the UserCC class. Internally, the UserCC class accesses the Oracle ADF Security context for the authenticated username (you’ll configure this later). The name of the authenticated user is a unique ID that MDS uses to store and retrieve data for a particular person.
For any application for which you want changes individually saved for an application user, you can configure the UserCC class.
To select and configure the UserCC class for the sample, follow the next few steps. From the Application Navigator,
- Open the Application Resources accordion panel.
- Expand the Descriptors and ADF META-INF nodes.
- Click adf-config.xml to select the file, right-click, and select Open from the context menu. adf-config.xml opens in the editor; the Overview tab appears by default.
- In the editor, select MDS and click the green plus (+) icon above the Customization Classes entry (see Figure 4).
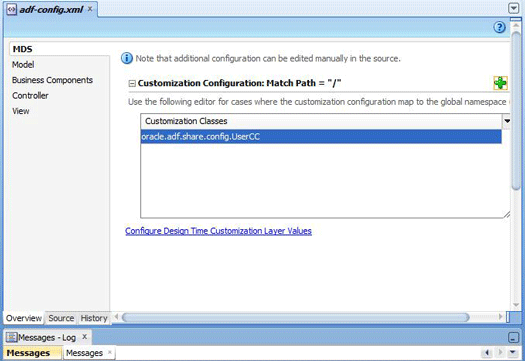 Figure 4: Editing the MDS customization layer for the UserCC class
 - In the Edit Customization Class dialog box, type UserCC in the Match Class or Package Namefield.
- Select the UserCC class from the Matching Classes and Packages list, and click OK.
These steps add metadata for the UserCC class to the adf-config.xml file.
For our sample dashboard application, only changes to the child component order of the af:panelDashboard component will be persisted, so let’s configure that now. Unlike other Oracle ADF Faces components, the af:panelDashboard component does not have a menu option for configuration, so you must manually modify the adf-config.xml file and add the appropriate metadata to identify allowable customization. As a convenience, the application’s adf-config.xml file already contains the required metadata, nested inside comment tags (see Figure 5), so you need only remove the tags.
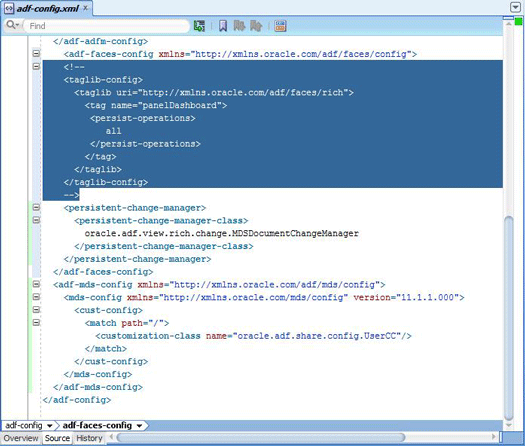
Figure 5: MDS configuration for panelDashboard in adf-config.xml
To manually edit the adf-config.xml file,
- Click the Source tab at the bottom of the editor where the adf-config.xml file is open
- Remove the comments around the taglib-config element
- Click the save icon in the Oracle JDeveloper tool bar to save all changes, and close adf-config.xml by clicking the x icon on the tab
Detecting Personalizations
For many Oracle ADF Faces components, the component’s renderer notifies the framework when an end user personalizes a page, and then it uses the Oracle ADF Faces change persistence framework to render the page. However, because the panelDashboard’s drag-and-drop behavior is a feature of the af:componentDrag behavior tag rather than of the component itself, the panelDashboard component does not automatically notify the framework about user-applied changes. Thus, for this sample application, you must use Java and the change persistence API directly to create a bean that notifies the framework. That’s been done for you in the DndHandlerBean, which you can now associate with the listener on the panelDashboard.
The panelDashboard DropListener component receives an event notification about any drag-and-drop action performed on the child components. To respond to component drop events in the application, the DropListener property must be configured to point to a managed bean method:
- Double-click the DashBoardPage.jspx file in the Application Navigator to open and display the page in the visual editor.
- Click the binoculars (search) icon at the top of the Structure window to toggle open the search input field.
- Type panelDashboard in the input field, and press Enter. Oracle JDeveloper will find and highlight the af:panelDashboard component (its node) in the page structure tree.
- With the panelDashboard component selected in the Structure window, open the Property Inspector by selecting View -> Property Inspector from the Oracle JDeveloper menu.
- In the Panel Dashboard—Property Inspector pane, click in the Find field (next to the magnifier icon) to activate the search input field.
- Type DropListener in the search field. As you type, the DropListener attribute becomes highlighted (in the Behavior section of the Property Inspector pane).
- Select Edit from the DropListener property menu. The Edit Property:DropListener dialog box appears.
- Select DndHandlerBean from the menu as the managed bean for the listener.
- Select dashBoardDropHandler as the method.
- Click OK to save the setting.
Upon drop event notification, the managed bean identifies the change in the panelDashboard child component order and writes this change to the Oracle ADF Faces change persistence framework, which passes this information on to MDS as per the configuration in the adf-conf.xml file.
For a better understanding of using Java to access the Oracle ADF Faces change persistence API, take a look at the code that constitutes the DndHandlerBean. From the Application Navigator, go to the ViewController -> Application Sources folder, in the oramag.sample.dashboard.view.beans.dashboard package.
At this point, you’ve implemented drag-and-drop for the panelDashboard component, so your application users can reorder child components at runtime. You’ve also set up MDS to persist changes to specific UI components. The one task remaining is to set up Oracle ADF Security to enforce user authentication so that UI changes can be saved for each user.
Setting Up Oracle ADF Security and Testing the Completed Application
When users access the dashboard from their browser, you want them to be prompted for a username and password. Implementing this in the sample requires configuring Oracle ADF Security in a simple wizard-driven process. From the Oracle JDeveloper menu,
- Select Application -> Secure -> Configure ADF Security to launch the Oracle ADF Security wizard. The Enable ADF Security pane (step 1 of 4) appears, enabling you to choose the type of authentication.
- Click ADF Authentication (in the Security Model section), and click Next to continue. By default,ADF Authentication has Http Basic Authentication selected as its type on the next pane (step 2 of 4) of the wizard.
- Leave Http Basic Authentication selected, and click Finish to save the settings and complete the wizard. A “Security Infrastructure Created” message appears.
- Click OK to dismiss the message.
With Oracle ADF Security enabled for authentication, you can now create some test users. From the Oracle JDeveloper menu, select Application -> Secure -> Users. Click the green plus (+) icon in the Users section of the dialog box for adding users, and create the test user accounts listed in Table 1.
Name
|
Password
|
Display name
|
Description
|
Test user 1
|
sking welcome1
|
Steven King
|
Leave this field empty.
|
Test user 2
|
dfaviet welcome1
|
Daniel Faviet
|
Leave this field empty.
|
When you have finished adding these test users, click the save icon in the Oracle JDeveloper tool bar to save your work.
Next Steps
READ more about Oracle ADF
|
You can now run the completed dashboard application with some real-world personalization scenarios. Run the application by right-clicking theDashBoardPage.jspx file in the Application Navigator pane and selecting Run from the context menu. In the browser’s login dialog box, authenticate as test user sking (sking/welcome1).
Rearrange the panel boxes by dragging and dropping them to new locations within the dashboard. (You’ll notice that the dashboard functionality itself hasn’t changed—the graph and the gauge are updated as they should be, and the result data in the two graphs at the bottom of the UI remains static.) When you’ve sufficiently modified the order of the UI items, close the browser.
Now rerun the application. Note that you can quickly restart the application from the Oracle JDeveloper log window, which contains the runtime URL, similar to the following:
http://localhost:7101/PanelDashboard-ViewController-context-root/faces/DashBoardPage.jspx
Open the log window if necessary by selecting View -> Log Window from the menu, and click the URL to rerun the dashboard application.
When the browser login dialog box appears, authenticate as sking/welcome1. This time, the panelDashboard child component order is read from MDS and the UI is populated in the order in which test user sking left it.
Close the browser, and click the URL in the Oracle JDeveloper log window to relaunch the dashboard. When prompted for user credentials, authenticate as test user dfaviet. The application displays the dashboard components in their default positions, because test user dfaviet has not yet personalized the UI.
Conclusion
This column has stepped you through the process of using Oracle JDeveloper’s declarative and visual tools to support persistent personalization of UI elements in a dashboard application. You can see how the combination of Oracle ADF Security for user authentication, Oracle ADF Faces behavior tags for implementing drag-and-drop, and the integrated change persistence framework in Oracle ADF Faces enable application developers to build personalizable application user interfaces with almost no need to write code.